The EaZD Deferred Renderer API
| Home | About EaZD | Deferred renderer API | SceneGraph3D API | SceneGraph3D scene description language |
Introduction
The EaZD deferred renderer is designed to operate either as a standalone rendering library using OpenGL, or as am integral part of the SceneGraph3D scene graph management toolkit. This document provides the essential information about linking and using the deferred renderer in your projects.
Including EaZD Deferred Renderer in your Project
EaZD comes with a static library file, DeferredRenderer.lib, and two header files, DeferredRenderer.h and DeferredRendererShaders.h. When building your application you must link with this static library, include DeferredRenderer.h and provide a path to this header file. The second header file is not necessary for linking and compiling your application and is only required when recompiling the library. In order to make the library easier to use and port, the shaders are stored as strings in DeferredRendererShaders.h. Additionally, most of them have been divided into modular parts to facilitate the reconfiguration of the renderer at run-time. So if you want to experiment with the rendering itself, this is probably the first place where you should look.
Standalone Initialization and Use
The first thing to take care of - if not already done - is the support for OpenGL extensions in your program, when compiling under Microsoft Windows. It is advised to use the OpenGL Extensions Wrangler library (GLEW) for this purpose, although manual initialization of the DLL entries is also possible:
#ifdef WIN32
glewInit();
#endif
Then, you may allocate the deferred renderer and after acquiring a GL context, initialize it:
DeferredRenderer *dr = new DeferredRenderer();
dr->init();
When in standalone operation, the EaZD deferred renderer requires the registration of two callback functions, the draw callback and the camera transformation callback. The first function contains all code necessary to render the geometry in OpenGL relative to the World Coordinate System (WCS). The second function provides all geometric transformations and the projection to transform everything to screen coordinates, including any (modelview) camera rotations and positioning, the perspective projection and the viewport transformation setup. The signatures of the two functions must be as follows:
void (*draw_callback)();
void (*camera_callback)();
You can pass the pointers to the draw and camera functions to the deferred renderer using the member functions:
setDrawCallback(void (*drw)() ) {}
and
setCameraCallback(void (*cm)() ) {}
For example:
void drawFunc();
void cameraFunc();
dr->setDrawCallback(drawFunc);
dr->setCameraCallback(cameraFunc);
...
void drawFunc()
{
    glMatrixMode(GL_MODELVIEW);
    glPushMatrix();
    glTranslatef(-10,0,0);
    glutSolidTeapot(5);
    glPopMatrix();
    glPushMatrix();
    glTranslatef(10,0,0);
    glutSolidTeapot(5);
    glPopMatrix();
}
void cameraFunc()
{
    extern int width, height;
    extern float look_at[3], pos[3];
    glMatrixMode(GL_MODELVIEW);
    glLoadIdentity();
    gluLookAt(pos[0], pos[1], pos[2], look_at[0], look_at[1], look_at[2], 0, 1, 0);
    glMatrixMode(GL_PROJECTION);
    glLoadIdentity();
    gluPerspective(60.0f, width/(float)height, 0.1f, 1000.0f);
    glViewport(0, 0, width, height);
}
To re-render the view when required, call the draw() member function of the deferred renderer:
dr->draw();
If shadows are enabled for at least one of the light sources, you should also call the updateShadows() method before the draw call in order to prepare the shadow maps. Note that as will be explained later in the performance tuning section, the deferred renderer can be ordered to skip frames in the calculation of the shadow maps for specific lights, so you do not have to take care of this in the drawing loop yourself. Therefore, in every window update, you can safely call the following code, regardless of the existance of shadows or the rate of their update:
dr->updateShadows();
dr->draw();
Initialization and Use with SceneGraph3D
Using the EaZD deferred renderer with the integrated scene graph is even easier. The OpenGL extensions initialization step remains the same of course (see above) and same goes for the allocation of the deferred renderer and its initialization after acquiring a GL context:
DeferredRenderer *dr = new DeferredRenderer();
dr->init();
To use the SceneGraph3D along with the deferred renderer, you must include the SceneGraph.h file in your project and also link with the SceneGraph.lib static library. In the scene graph mode of operation, EaZD does not require the registration of any callback function, as all transformations and geometry rendering is handled internally by SceneGraph3D. You only have to initialize the scene graph and tell it which renderer object to use for output:
World3D *world = new World3D();
world->setRenderer(dr);
Yes, this means that you may provide alternative editions of a renderer, switch between different renderers, or attach a renderer to multiple scene graphs. As long as you can provide an object subclassed from the DeferredRenderer class as a renderer, you are fine. If you pay close attention to the declaration of the setRenderer() method of the scene graph, you will discover that it actually takes as input a GenericRenderer object, i.e. a superclass instance of DeferredRenderer. This is done to facilitate the deployment of the scene graph even in platforms where shaders cannot be used or the specifications do not meet the requirements of EaZD. Of course you will have to provide your own implementation for most operations. In this case, you must also disable the deferred rendering support of the scene graph by undefining (commenting out) the _USING_DEFERRED_RENDERING_ in SceneGraph.h.
After EaZD initialization, you can proceed to loading the scene file and prepare the scene graph for rendering:
world->load(argv[1]);
world->init();
Do not forget to deallocate the scene graph object before doing the same with the deferred renderer object, when closing down your application.
Geometry Bins
To be able to treat parts of the content in a different manner or in a specified order, EaZD uses four bins, where geometry must be sorted either at creation or dynamically. The renderer traverses the scene graph in separate passes, each time enabling one bin state. It is up to the programmer to perform conditional checks to allow geometry to be displayed in each pass according to the bin it is assigned to. All implemented scene ghraph nodes adhere to this principle. For instance, geometry nodes split primitives according to material transparency, light sources get drawn as glowing particles when a particle bin is enabled and so on. There are 4 bins at the moment:
- SCENE_GRAPH_RENDER_MODE_HIDDEN. When a "hidden" geometry pass is performed, the geometry that is marked as non visible is displayed. This pass enables the rendering of proxies for shadows etc. This is not very frequently used.
- SCENE_GRAPH_RENDER_MODE_NORMAL. This is the standard (and first in order) rendering pass that displays opaque geometry. Note that polygons with transparent textures are also rendererd here.
- SCENE_GRAPH_RENDER_MODE_TRANSPARENCY. This bin is rendered after the normal bin and executes a blending pass with the depth buffer update disabled. Polygons with transparent materials should be rendered here.
- SCENE_GRAPH_RENDER_MODE_PARTICLES. This bin represents the rendering of particles and is the last in order to be displayed in the frame buffer. It is a special bin as the OpenGL commands are treated in a very specific manner to instruct a geometry shader to produce particles. See the particles section below for instructions on how to render this kind of geometry.
In general, one specifies that certain parts of a node's geometry are targeted to a specific pass, by checking:
// within the draw method of a scene graph node:
if (render_mode==SCENE_GRAPH_RENDER_MODE_[HIDDEN|NORMAL|TRANSPARENCY|PARTICLES])
{
// do some drawing
}
Buffer Preview and Statistics
EaZD provides full preview of all buffers for debugging and educational purposes. You can show a buffer by calling in each frame:
dr->show(buf);
Where (int) buf is one of:
- DR_TARGET_COLOR
- DR_TARGET_NORMAL
- DR_TARGET_SPECULAR
- DR_TARGET_LIGHTING
- DR_TARGET_DEPTH
- DR_TARGET_FRAMEBUFFER
- DR_TARGET_SHADOWMAP
- DR_TARGET_GLOW
- DR_TARGET_AO
Simple statistics (average frame rate and average frames per second) are obtained by calling the showStatistics() member function. You can also obtain the current average framerate by calling the getFrameRate() mathod. So, the rendering of the main window may include the following calls:
void RenderMainWindow()
{
    extern bool enable_preciew;
    extern int cur_preview_buf;

    dr->updateShadows();              //shadow buffer rendering
    dr->draw();                       //main drawing call
    if (enable_preview)
    {
        glViewport(0,0,width,height); //set the preview window area
        dr->show(cur_preview_buf);    //render the buffer preview
    }
    dr->showStatistics();             //draw textual statistics
    glutSwapBuffers();                //finish frame and swap buffers
}
Lights and Shadows
The EaZD deferred renderer implements its own light sources, so the OpenGL lights are completeley disregarded. The light managment of the renderer (also present in the GenericRenderer class to be able to simulate its behavior in plain OpenGL) defines a maximum of 128 internal light sources that can be created, set, switched on/off, modified and moved around at any time. The light sources can be point lights, area lights (point lights with a non-zero radius) and spot lights, with or without attenuation or shadows. Lights also have a range of effect (and a near range for defining the closest-to-light distance for the shadow map) as well as an RGB color value which can be set to more than (1,1,1). Internally, illumination can withstand a 200% overexposure without being saturated, although the final result depends on the output buffer color accuracy.
To add a light to the application (not via the scene graph, which handles them as normal scene graph nodes and performs the rest of the operations internally), you simply call the int createLight() method of the renderer. This method initializes a new light source (disabled at the beginning) and returns an identifier to it. Further calls to modify the light source are done through this identifier:
int light1 - dr->createLight();
dr->setLightColor(light1, 1.0f, 0.95f, 0.89f);
dr->setLightPosition(light1, 10.0f, 300.0f, -50.0f);
dr->enableLight(light1);
...
Light position is defined relative to the WCS. The createLight() method returns -1 if a light source cannot be allocated. The order of light commands is not restrictive, as far as the light has been succesfully created first and any call may be made at any time. Bear in mind though that switching some of the attributes such as the shadow sampling method, requires the re-parsing of the shaders, resulting in a small delay.
The various attributes of the light sources are set with the following methods:
- void setAmbient(float r, float g, float b). Defines the global ambient color and intensity. When the ambient occlusion processing is activated, this value is modulated per pixel by the estimated obscurance.
- void setLightColor(int light, float r, float g, float b). Defines the color of the light. Values can exceed 1.0.
- void setLightPosition(int light, float x, float y, float z). Sets the position of the light source. See also below, for shadow-related information.
- void setLightTarget(int light, float x, float y, float z). Defines the look-at point for shadow maps and spot lights. Currently spot lights are not supported.
- void setLightIntensity(int light, int intens). Multiplies the color by a scaling factor. This is useful when you need to dynamically modulate the light intensity (e.g. for a flash of light) without worrying about the initial color of the source.
- void enableLight(int light, bool ltenable). Switch on or off the cureent light.
- void setLightAttenuation(int light, bool attn). Enable or disable the light attenuation. The attenuation model supported is linear. The corresponding shader functionality is not yet implemented.
- void enableGlow(bool g). Enables the post effect processing of high intensity fragments to spil the overexposed intensity to neighboring pixels in the final frame buffer.
- void setAOMethod(int method). Set the method for calculating the ambient illumination of the scene. Currently, two options are available, DR_AO_METHOD_NONE, which uses the unmodulated global ambient component and the DR_AO_METHOD_SSAO, which calculates screen-space ambient occlusion based on the split-horizon algorithm. Note that you have to expect a severe slowdown when activating this type of global illumination effect, even though the calculations are performed at half the frame buffer resolution (we are not referringto "window" resolution here, as it may be different from the internal buffer size - see performance tuning section).
- void setAORadius(float r). Ambient occlusion requires a radius of effect within which to search for light occlusion. This method provides the global ambient occlusion radius in world units.
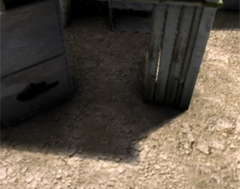
Shadows are enabled individually for each light source. Four different modes are supported for sampling the shadow maps, nearest neighbor, 2X2 multisampling with percentage closer filtering (PCF), 16-tap disk sampling PCF and 16-tap variance shadow maps (VSM - not yet implemented). The sampling mode is the same for all shadow maps. Soft shadows are produced with all modes except the nearest neighbor sampling, when the light radious is greater than zero. The size of the light source determines the fuzziness of the penumbra. EaZD produces realistic penumbrae by taking into account the distance to the occluder in order to calculate the shadow spread factor:
The methods associated with the shadow generation are listed below:
- void setLightRanges(int light, float near, float far). Defines the near and far ranges for the shadow map frustum. The far range is also used as the drop-off distance for the attenuation of the light intensity when the attenuation is enabled.
- void setLightPosition(int light, float x, float y, float z). The position of the light source. This is used for any kinf of light, including non shadow-casting lights. Along with the setLightTarget() and setLightCone() methods, it defines the frustum of the shadow map, using the near and far ranges set with the setLightRanges() call.
- void setLightTarget(int light, float x, float y, float z). Defines the "look-at" point of the shadow map viewing transformation
- void enableLightShadows(int light, bool sh). Enable or disable shadow for the current light.
- void setLightSize(int light, float sz). Define the size (radius) of the light source. This affects how soft the shadows are going to be.
- void setLightSkipFrames(int light, int sf). Requests an update of the shadow buffer every sf frames. When zero, shadow maps are updated in every draw call. Initially this is set to zero for all lights.
- void setLightCone(int light, float a). Defines the apperture (end-to-end) of the rectangular frustum of the shadow map.
- setShadowResolution(int light, int res). Defines the resolution of the shadow map (res x res).
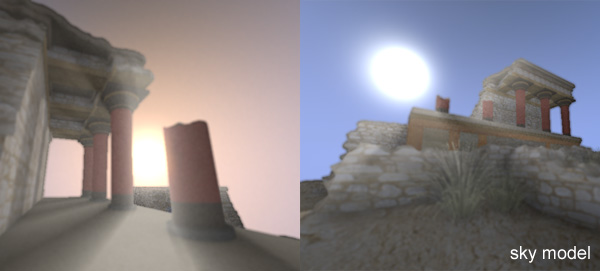
Sky Model
EaZD provides a custom empirical sky illumination model. The user declares which light source is the sun and computes the sky dome illumination according to the light's position (see also the scene graph node description). The model is not physically-based but it is very fast to compute. To further increase realism, the sun can be rendererd as volumetric light, casting correct light shafts by ray marching (with shadows). The number of samples along each ray is adjustable.
To enable the sky model use the method void enableSkylight(bool e). You can obtain a pointer to the data structure SkyModel to set its parameters by calling SkyModel * getSkyModel(). The SkyModel class isdefined as follows:
class SkyModel
{
public:
Vector3D fog_color;
float density;
float fog_distance;
float fog_alpha;
bool use_fog;
bool volumetric;
int samples;
SkyModel()
};
Particles
EaZD includes a particle renderer for creating view-aligned "spherical" particles whose transparency is modulated according to the portion of the particle's sphere not intersected with background geometry. This is done in order to convey a true three-dimensional impression for effects involving particles (e.g. glowing particles, smoke etc) and help blend the billboards with the opaque geometry more naturally. This procedure is implemented as a separate pass, where a shader is enabled to process all user data and construct the necessary geometry for the particlres. All the user has to do is declare a part of the draw function as using "particle mode" (e.g. a conditional statement within a draw method of a scene graph node) and write a piece of code that declares position and radius of particles as glVertex4f points, particle colors as glColor4f and bind (or not) a texture to use over the particle's billboard. The reference frame of the current modelview matrix is maintained, thus allowing to very easily generate a simple scene graph node that draws a number of particles on screen. No specific particle class has been implemented at this moment but the particle rendering is used to produce glowing light sources (see respective draw method of light source node).
To enable the rendering of particles in a scene graph node, just check if the current pass involves particle rendering. If this is the case, then the appropriate shader has been enabled and all subsequent commands are interpreted in a special way:
if (render_mode==SCENE_GRAPH_RENDER_MODE_PARTICLES)
{
// draw particles here. All vertex transformations apply.
}
To draw the particles themselves, call glVertex4f, where the XYZ components are the local coordinates of the particle's center and W is the particle radius. The color and alpha are controlled by the glColor4f function. Make sure to render the particles as GL_POINTS:
renderer->getParticleRenderer()->useTexture(false);
renderer->getParticleRenderer()->setIntensity(2.0f*max(color.x,max(color.y,color.z)));
glEnable(GL_COLOR_MATERIAL);
glBegin(GL_POINTS);
glColor4f(color.x,color.y,color.z,0.2f);
glVertex4f(position.x,position.y,position.z,glow_radius);
glEnd();
glDisable(GL_COLOR_MATERIAL);
The useTexture and setIntensity methods of the ParticleRenderer (obtained from the deferred renderer by its getPArticleRenderer method) notify the renderer to use or ignore texturing and boost the brightness of the particles (color burn - glow). Texturing must be enabled or disabled from the particle renderer state, otherwise black particles will be shown (color is modulated by the texture) if no texture is provided or enabled by OpenGL. Furthermore, if no texturing is needed, this can save a signifficant number of texture fetches in case of many particles.
Other Effects
EaZD supports a camera depth-of-field defocusing effect to simulate realistic non-pinhole camera lenses. This is controlled by the following methods:
- void enableDOF(bool f). Enables or disables the depth-of-field shader.
- void setDOF(float distance, float range). Provides the focal range (distance parameter) of the lens and a focal range. At distance units from the camera position there is no bluring, while at distance-range and distance+range units and beyond we get the maximum defocus.
The frame buffer supports high dynamic range operations such as tone mapping and bloom. Tone mapping is applied at the post-processing stage and is controlled by the following methods:
- void setHDRKey(float k). Provides a hint about the expected average intensity of the image (same units as the light sources).
- void setHDRWhitePoint(float wr, float wg, float wb). Specifies the maximum (reference) white saturation limit. Values above this threshold are considered "over-bright". Note that the RGB white point is usefull to also change the overall tint of the image.
- void setHDRMethod(int m). Specifies whether EaZD deferred render respects the user-defined key (m=DR_HDR_MANUAL) or estimates the mean key from sampling the frame buffer (m=DR_HDR_AUTO). Measurement is performed via mip-mapping, thus adding as little overhead as possible.
Helper Methods
In order to adjust the size of the internal buffers of the deferred renderer one must call the void resize(int w, int h) method from within the corrsponding window callback or event handler function, otherwise distortion and loss of buffer resolution will occur. The two arguments are the actual width and height of the window. To set the internal resolution to a different scaling do not pass modified values to this method; there are specialized methods for setting the internal scaling of of the deferred renderer buffers (see performance tuning section).
To obtain the texture associated with an internal buffer for use outside the deferred renderer, you can call the GLuint getBuffer(int id) method and pass the buffer id (same as the ids for the buffer preview, except the shadow buffer, which is hidden).
Performance Tuning
If performance is slow due to a high resolution output or any other reason, there are a few things that you can do to increase the framerate. First, you can reduce the internal buffer size by either setting a a scale ration between the actual window size and the frame buffer size using the method void setBufferScale(float scale) or by providing a fixed size for the internal buffer, regardless of the actua lwindow size using the method void setFixedBufferSize(int width, int height). You can unlock the internal buffer size by calling void setFreeBufferSize(). The (uniform) scale factor parameter of the setBufferScale(float scale) is defiend as:
(Internal Buffer Size)/(Actual Window Size).
Turning off the ambient occlusion can cause a dramatic improvement in the framerate as it is a major GPU hog, or alternatively you may want to reduce the internal buffer resolution. Halving the internal buffer resolution effectively doubles the performance.
As mentioned in the lights and shadows section, if you have too many lights enabled that cast shadows, you can decrease the rate of shadow map calculations by calling the void setLightSkipFrames(int light, int sf) method (and of course reduce their size).
Finally, EaZD facilitates the dynamic resizing of the display buffer as a function of the frame rate. using a combination of the getFrameRate() and setBufferScale() methods, you can dynamically adjust the internal buffers to maintain a steady performance. In future versions this will be also included as an optional internal operation.
Last update: 23 Feb. 2010